Tuesday, November 22, 2011

Lemongrass and Ginger Beef Salad

 
I happen to have a little insight into one of my Christmas presents this year.  It involves Vietnamese street food and recipes and is a book.  Yup.  And just knowing this got me all excited about Vietnamese food.  Also, I had a craving for fresh salady things.  So I did a little squirreling around the internet and mashed a few different things I'd seen together to make this wonderful, fresh and very spicy salad.  The spicy lemongrass and ginger paste softens the beef to it's super tender, and the pickled carrots... well they'll be featuring a lot in my tummy from now on, that's for sure.


Ingredients (serves 4):
  • 500g beef sliced into strips
  • half an iceberg lettuce
  • 1 Lebanese cucumber
  • 1 carrot
  • 1 bunch each mint, coriander, basil
  • 1 stalk lemongrass (white part only)
  • 1 walnut sized knob of ginger
  • 2 birds eye chilies
  • 1 clove garlic
  • 1/2 cup rice wine vinegar
  • 1/4 cup sugar
  • 1 teaspoon salt
  • 2 tablespoons fish sauce
  • Juice of half a lemon
  • 1 shallot
  • Fried rice noodles

Take the spices and smash them up in a mortar and pestle.  Add the fish sauce and lemon juice and continue to grind them until they form a thick paste.


Then place your beef strips in a bowl and smear the paste over them, massaging it in with your hands.  Place the beef back in the fridge and marinate in the spices for at least an hour.


Next, prepare the pickled carrots.  Finely slice the carrots.  Then mix together the vinegar, sugar and salt, and cover the carrots with the liquid.  Also place in the fridge for 45 minute to an hour (the pickled carrots will keep for up to several weeks).


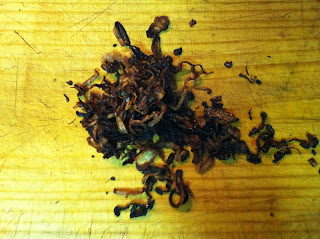
Prepare the fried shallots.  Finely slice them and sizzle them in about 1cm vegetable oil in the bottom of your wok. Watch them closely, as they will take a while, and then turn from pinkish to brown to black within moments.  Be ready to remove them as soon as they start to darken.  Drain on a board.


About 50 minutes later, take the lettuce and finely shred about half.  Julienne the cucumber, and finely chop the herbs.


Prepare the wok with a fine sheen of sesame oil, and fry the beef until browned. 


Finally, arrange the lettuce, cucumber, herbs and carrots in your bowl.  Add a serve of the beef. Lastly, sprinkle some of the noodles and fried shallots on top. 


It's healthy, insanely tasty, and has the most wonderful mix of flavours.  If you have a sensitive stomach maybe go easy on the chili.  I didn't do this.  I have no regrets.

Sunday, November 20, 2011

Double chocolate biscuits with crunchy pepita tops


In a bid to be economical, we are attempting to not buy lunch at all this week, and to cook all the fresh food in the house before doing something reckless like going out for laksa.  So, for purely financial reasons I felt compelled to bake us a supply of biscuits to provide sweet sweet sustenance throughout the work week.


But because it's Sunday and I'm feeling pretty lazy, I decided I couldn't be arsed with recipes.  And I figured, biscuits, how hard can they be, right?  So I made some.  Just like that.  I didn't really know what I was doing so I didn't bother with any measurements that weren't bleedingly obvious.   And they've turned out to be pretty darn alright. I am feeling mighty chuffed right this moment.


Ingredients:
  • 125g, or half a stick, unsalted butter
  • 1 cup brown sugar
  • vanilla essence
  • 1 egg
  • 1 1/2 cups plain flour
  • nutmeg
  • 2 tablespoons cocoa
  • 50g couverture chocolate
  • pepitas (aka little green seeds)

Make them the way you'd make any biscuits.  Heat the oven to 160 degrees (or 170 if your oven isn't fan-forced).  Cream the butter and sugar.  Add the vanilla and egg and continue to beat.  Add the flour, nutmeg and cocoa and beat.


Take the square of chocolate and hack it into shards.  If it's good quality chocolate it will shatter nicely.  Stir it into the biscuit dough.


Line two trays with baking paper.  Scoop the dough into walnut sized balls and press the tops slightly with your fingers.  Then press them gently into the pepitas and place them on the trays.


Bake for 15 minutes.  While baking, paint your nails.  Cool them on a rack.  Poke them with your finger.  Check they're not poisoned.  Check again, you'd really hate to be poisoning people accidentally.


Then sit down properly like a civilised lady and have two more with a cup of rooibos chai.


Saturday, November 19, 2011

Sweet Potato Gnocchi with Pea Pesto and Prosciutto

 
Last weekend my darling friend Jess had an afternoon tea for her birthday.  Jess is a fantastic baker and cook, and she prepared some awesome treats for us.  But perhaps my favourite were the savoury tarts smeared high with a home-made pea and cashew nut pesto, topped with cucumber and mint.

I had peas!  Frozen ones, actually.  Then I started fantasising about what I'd do with a pea pesto, and I quickly determined that it should be eaten with a sweet potato gnocchi.  When I got home from work the other night, not only did I already have sweet and regular potatoes at home, but I realised I also had some prosciutto and lots of fresh herbs in the fridge.  It should also be noted that having actually managed to leave the office by 5:30 - an almost unheard of phenomenon - I was all psyched for home-made gnocchi!

If you haven't made gnocchi before I urge you to do it.  It's as easy as making scones, as fun as playing with Play-Doh, and as delicious as eating freshly home-made gnocchi.  I find all sweet potato is a bit too sweet, so I used a mix of potatoes: one russet, one desiree and one large sweet.

Ingredients:
  • two regular potatoes
  • one sweet potato
  • nutmeg
  • approx 2 1/2 cups plain flour
  • 2 cups peas
  • fresh mint, oregano, thyme or any other herbs
  • 1 cup pine nuts and cashews
  • 1 lemon
  • olive oil
  • garlic
  •  8 slices prosciutto
 
To make the gnocchi, boil the potatoes until soft enough to mash.  Then mash them good!  You want them to be as creamy as possible with no lumps.  No lumps at all, I tells ya!  I was fretting that I was on the path to lumpy gnocchi when I remembered my bar-mix - or wizzy stick as I sometimes think of it.  This turned my still lumpy mash into a creamy potato gloop. Add a little nutmeg at this point, you won't be sorry.


Then flour your bench with about a cup of flour, and tip your cream potato mixture into it.  Get as much flour as possible on your hands because the potato will be as sticky as get out.  Gently fold the flour into the potato dough, adding more flour as you need it, until it has a modicum of stuctural integrity.  You want the gnocchi to be as tender as possible, so it's important not to overwork it.


 Roll the gnocchi out into hilarious sausages if your mind is in the gutter, as mine was as I was cooking, and then slice your little dumplings off the end.  Again, keeping everything well dusted with flour, that the gnocchi might touch.  At this point you could put them in the fridge until cooking them, or freeze them for another occasion if you want.  Or EAT THEM RIGHT NOW.


While the potatoes are boiling, set up another pot of boiling water and cook your peas.  Then add most of the peas (reserving about 1/2 a cups worth) to your mixer, with the nuts, herbs, lemon juice, two cloves of garlic, salt, pepper and olive oil.  If you don't have a cooked-cheese-loathing boyfriend, I'd add some parmesan or pecorino at this point as well.  As for me, I abstained out of love.  Stupid, no-cheese love.


Anyway, pulse the pesto mix together until it forms a slightly chunky dip consistency (which, incidentally, is how I plan to eat the remainder ie with corn chips).  That's it. Pea pesto.


To prepare the gnocchi, bring water to the boil in a wide pot and drop in the gnocchi, ensuring to space them so they form one layer.  They'll drop to the floor of the pot; when they float to the surface (1 to 2 minutes) they are ready! Remove with a slotted spoon and place them on a plate to drain.  You can serve them like this, but I like to add to the 'toothiness' of them by lightly pan frying them, like any good dumpling.

So once all the gnocchi is boiled, slice the prosciutto into little bits and fry in a small amount of oil.  The prosciutto will leech all it's delicious porky fat into the pan as well.  Remove the prosciutto when it starts to crispin, reserving all the fat in the pan.  Then add your gnocchi to the pan and lightly sautee in the prosciutto fat.  You have just created one of the most delicious things ever.  But it gets better.  


Remove the gnocchi and add the pea pesto and a splash of water and heat through.  Add the extra peas and put the gnocchi back in, and mix through.  Finally add the prosciutto. 


Cooked-cheese-loathing man declared it one of the best meals I'd ever made him, because it had both complementary colours and flavours.  We wolfed it in front of SBS's Thursday night food show line-up, and felt grateful we hadn't sat through those shows and all their delectable treats with anything less delicious for ourselves.  Then I took the leftovers to work for office-time food bragging.  It happens.


Sunday, November 13, 2011

Black Forest Cake


Remember about a year ago when I said I was going to post a Black Forest Cake and then I didn't do it? I ended up making that cake between midnight and 2am for a function the next day and was so rushed I didn't take photos or anything. I know.  I'm kinda flakey sometimes.  Sorry.


But then it was Mum's birthday yesterday and my brother (very accurately) posited that she would want a Black Forest Cake.  I had already volunteered to make the birthday cake, so I got a second chance!  I used a different recipe this time, taking one from the BBC website.  And wow! Wowowowow.  The thing that made this cake amazing was, in my opinion, the quality of the actual cake.  And the thing that made the cake so amazingly dense and chocolatey was the calibre of the cocoa - proper Dutch cocoa.  I am not usually a massive bowl licker, but this cake mix was so delicious that I scraped it clean with my finger and then my tongue.

So that is my advice to you.  Make this cake with the best cocoa you can find.  Clean your finger and flex your tongue.  You won't be sorry.


Ingredients - for the cake:
  • 340 g unsalted butter
  • 340 g castor sugar
  • 240g self raising flour
  • 100g cocoa
  • 6 eggs
For the filling and icing:
  • 1 tub cream
  • 1 large jar morello cherries in syrup
  • Big splash of Kirsch
  • 100 g dark cooking chocolate

Heat the oven to 170 degrees, and grease and line a 20cm cake tin.  Using the right size tin is important, as you want the cake to have enough height to be able to slice it into layers later on.


With beaters, cream the butter and sugar, then add the eggs one at a time.  Sift the flour and cocoa and using a metal spoon, fold into the mixture.


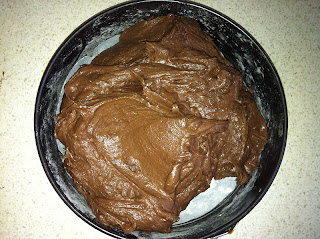
Scoop into the cake tin.  This mixture is so moussey and thick it will sit in the tin, so take a spatula or knife and spread it evenly into a cakey shape.  THEN LICK EVERYTHING THE COCOA HAS TOUCHED.


Place in the oven.  The original recipe said bake for 35 or 40 minutes, but at 40 minutes my cake was still super wobbly.  I ended up cooking it for just over an hour, and moved the rack to a higher position after about 50 minutes.  Next time, I'll set the timer for 50 minutes and check it every five minutes until it's perfect.  Remove from the oven and cool in the tin for five minutes.  Then continue to cool on a cake rack for another five to 10 minutes.


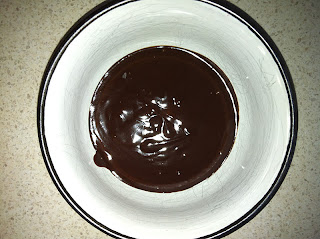
While the cake is baking prepare the ganache icing.  Pour half the cream into a saucepan and scald until almost boiling.  Then put the chocolate in the cream and take off the heat, stirring continuously until mixed through.  Then put in the fridge to cool.


Next pour out about 3/4 cup of syrup off the cherries into a saucepan and add a generous splash of Kirsch.  I didn't want my cake to taste too boozy so I cooked off a little of the Kirsh for a few minutes. Then put this aside to cool too.


Once the cake is cooled on the rack, slice into thirds.  Then spoon the cherry syrup mixture evenly over the three cake slices.  Then allow the syrup to sink in while you prepare the remaining cream by whipping it with a tablespoon of icing sugar and a few drops of vanilla essence.


Now for the assembly!  Spread half the cream over the base of the cake.  Then take half the cherries, squeeze out any excess juice and spread them over the cream.  Then place the next layer of cake on and repeat the layering.  Once you've placed the top on the cake, press down gently on the whole cake with your hands to firmly set it all together.


Take the chocolate mix from the fridge and stir it up with a knife, then spread this over the cake too.  Finally, grate some remaining cooking chocolate over the ganache, and place the cake in the fridge for the icing to set.


Mum will approve.